Timber veneer captures the intrinsic beauty of wood, adding warmth and character to a variety of spaces. Its versatility makes it a favored material among architects, designers, and homeowners alike. Not only does timber veneer provide the visual appeal of solid wood, but it also offers a more sustainable and cost-effective solution. The intricate patterns, the rich colors, and the unique texture of wood grain bring a touch of nature indoors, creating an atmosphere that is both elegant and comforting.
Understanding Clear Finishes for Timber Veneer
Clear finishes are transparent coatings applied to timber veneer to protect and enhance its natural beauty. There are several types of clear finishes available, each with its unique properties and benefits:
- Varnish: Known for its durability and resistance to heat, water, and chemicals. It’s ideal for areas that endure heavy use.
- Lacquer: Dries quickly and provides a glossy, hard finish. It is often used for a high-shine effect.
- Shellac: A natural product that’s non-toxic and easy to repair, giving a warm amber hue to the veneer.
- Polyurethane: Available in both water- and oil-based varieties, it offers robust protection and is favoured for its versatility.
Utilising a clear finish on timber veneer not only prolongs its life but also enhances the material’s natural charm. The clear coat deepens the colour and grain definition, giving the veneer a lustrous finish that can range from matte to glossy, depending on the product used. It also provides a cleanable surface, which helps to keep the wood hygienic and looking its best.
Preparing Timber Veneer for Clear Finishing
Before applying any finish, proper preparation of the timber veneer surface is paramount. An impeccable finish begins with meticulous sanding and cleaning:
- Sanding the Veneer
Start with a coarse-grit sandpaper to even out any irregularities and move gradually to finer grits for a smooth base. It’s important to sand in the direction of the grain to prevent scratches that could be accentuated by the clear finish.
Between sandings, use a tack cloth or a vacuum with a soft brush attachment to remove all dust particles. The final sanding should be with a very fine sandpaper to create a polished surface that’s ready for finishing.
- Cleaning the Surface
After sanding, the veneer must be free of dust, oils, and any other contaminants. A damp cloth can be used to wipe down the surface, allowing it to dry completely before proceeding.
For oil-based finishes, a solvent like mineral spirits can be used for cleaning. However, for water-based finishes, stick to plain water to avoid any chemical reactions that could spoil the finish.
Application Techniques for Clear Finishes
The application of clear finishes requires precision and care to ensure a flawless result. The method chosen can affect the ease of application, drying time, and the final appearance of the timber veneer.
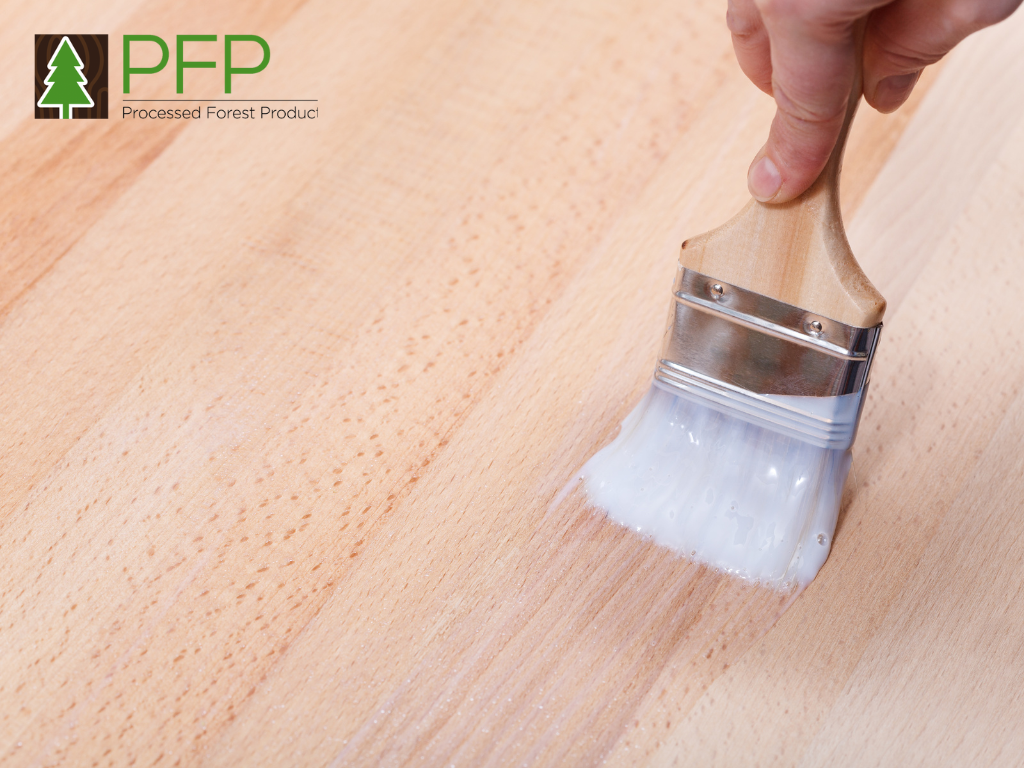
Brushing
Brushing is the most traditional method of applying clear finishes. It is best suited for varnishes and polyurethanes.
Use a high-quality natural or synthetic brush. The key is to apply the finish with even strokes in the direction of the grain to avoid brush marks.
Maintain a wet edge as you work to prevent lap marks, and apply the finish thinly to avoid drips.
Spraying
Spraying is ideal for lacquers and is suitable for large-scale or intricate projects. It requires specialized equipment like a spray gun and proper ventilation.
When spraying, multiple light coats are preferable to a few heavy ones. This method provides a smooth, uniform finish without brush strokes.
It’s important to practice your technique to get an even mist and avoid runs.
Wiping:
Wiping can be used with oil-based finishes and is perfect for achieving a hand-rubbed look. It is often considered the easiest method for beginners.
Apply the finish with a clean, lint-free cloth, working it into the wood in a circular motion and then wiping along the grain.
Wiping gives you control over the build-up of the finish and is excellent for delicate veneer that may be sensitive to brushwork or spraying.
Regardless of the method, the key to a uniform coat is to work quickly and efficiently, applying thin, even layers. It’s better to build up the finish gradually than to try to achieve the final thickness in one go.
Drying and Curing Clear Finishes
Drying and curing are critical stages in the finishing process. They are often confused, but there is a distinct difference: drying is when the solvent evaporates and the finish becomes touch dry, whereas curing is when the finish reaches its full hardness and durability.
Drying Process
Environmental factors such as temperature, humidity, and airflow can significantly affect drying times.
Warm, dry conditions are ideal for drying, but direct sunlight or a draft can cause the finish to dry too quickly and unevenly.
Curing Times
Each type of finish has its own curing timeline. For example, oil-based polyurethanes might take a few days to touch dry but could need weeks to fully cure.
The veneer should be left undisturbed during this time to ensure the finish hardens properly.
The Visual Impact of Clear Finishes on Timber Veneer
A clear finish not only protects the timber veneer but also enhances its inherent beauty. The depth and clarity of the finish can magnify the wood’s natural grain and colour, adding richness and vibrancy.
Enhancing Wood Grain and Color
The choice of finish can affect the veneer’s final appearance. For example, oil-based finishes tend to give a warmer, amber tone, while water-based finishes can maintain the wood’s natural color.
The level of sheen can also impact the wood’s appearance. Gloss finishes will reflect more light and can make the surface more dramatic, while matte finishes offer a subtler, more natural look.
Selecting the Right Clear Finish
Consider the intended use of the piece and the look you aim to achieve. For areas exposed to moisture or heat, a more durable finish like a varnish may be best.
Always test the finish on a scrap piece or an inconspicuous area to ensure you are satisfied with the appearance.
Maintaining Clear-Finished Timber Veneer
Maintaining the pristine condition of clear-finished timber veneer is essential for both aesthetic and practical reasons. Regular care not only keeps the veneer looking its best but also extends the life of the finish.
- Routine Care: Regular dusting with a soft, dry cloth or microfiber duster is crucial to prevent the build-up of dirt and grime. For more thorough cleaning, a slightly damp cloth with a mild detergent is sufficient; however, it’s important to avoid harsh chemicals or abrasive cleaners that can damage the finish. Additionally, safeguarding the veneer from potential heat damage, such as from hot dishes or electronics, is imperative to maintain the integrity of the clear finish.
- Repairing Minor Damage: Minor surface damage, such as scratches and dents, can often be remedied without a complete refinishing. Touch-up markers, wax sticks, or filler pencils in colors matching the wood can disguise scratches. For lifting dents, applying a damp cloth and gentle heat with an iron can swell the wood fibers, potentially restoring the veneer’s smooth surface.
- Reapplication of Clear Finishes: Over time, and particularly in areas of heavy use, the clear finish may degrade. To renew the protective layer, a light sanding of the old finish with fine-grit sandpaper can prepare the surface for a new coat. This reapplication should follow the original methods used, whether by brushing, spraying, or wiping.
Troubleshooting Clear Finish Applications
Applying clear finishes can sometimes lead to issues that mar the appearance of timber veneer. Knowing how to identify and address these issues can ensure a flawless finish.
- Common Issues: Streaks often result from uneven application but can be resolved by lightly sanding the area and reapplying a thin, even coat. Bubbles, potentially caused by over-stirring or thick application, can be prevented by stirring the finish gently and applying in multiple thin layers. Discoloration can occur due to contamination or moisture and is best prevented by ensuring the veneer is clean and dry before application.
- Preventative Measures: It is advisable to first test the finish on a scrap piece of veneer. Always apply finishes under recommended conditions, which typically means avoiding extreme temperatures and humidity. Adhering to the manufacturer’s instructions regarding drying and re-coat times is also essential for achieving the best finish.
Selecting Eco-Friendly Clear Finishes
As environmental consciousness increases, so does the popularity of eco-friendly clear finishes. These alternatives are designed to minimize harmful emissions and are typically composed of natural or renewable resources.
- Eco-Friendly Options: When selecting a finish, consider water-based products or those with low VOCs, or opt for finishes derived from natural oils and waxes. Certification by recognized environmental standards can also guide the selection of sustainable finish products.
- Contribution to Veneer Longevity: Eco-friendly finishes not only reduce the environmental impact but also contribute to the longevity of timber veneer by diminishing the need for frequent refinishing. These sustainable products also reduce the release of toxic compounds into the environment, making them a responsible choice for both indoor air quality and the planet.
Conclusion
Clear finishing is a vital step in the preservation and enhancement of timber veneer. It not only protects the wood but also draws out its natural beauty, allowing the organic patterns and colors to shine through. By understanding the various types of finishes, their application, and maintenance, one can ensure that the timber veneer remains a durable and attractive feature for years to come. Proper care, timely repairs, and the choice of eco-friendly products will contribute to the sustainability and longevity of the veneer. As with any aspect of fine woodworking, patience and attention to detail in the finishing process will yield the most beautiful and long-lasting results.